Friday, September 18, 2009

Correlation with BPEL

An application must maintain data integrity when messages are exchanged between services. A manufacturer that receives orders, for example, must not mix data for one order with the data for another.

A BPEL process addresses this issue with correlation sets, each of which is a list of properties whose values are expected to remain constant throughout a process or throughout a specific scope, even as data is transmitted to and from partner services.

For purposes of an example, here is a process that records the purchase orders of custumers, so it needs to identify each specific custumer-order. This is the diagram of the whole process:


The following steps describe how to identify a process using correlation sets:

  1. First, the following namespace into your WSDL file:
              xmlns:bpws="http://docs.oasis-open.org/wsbpel/2.0/varprop"

  2. Create the property to be used to identify your process. In this example we will use 2 values to identify the process or the PO of the customer, so add the following at the end of your WSDL.
                    <bpws:property name="customerID" type="p:string" />
                    <bpws:property name="orderNumber" type="p:string" />

  3. The process will start after answer the first request, for example, when the customer puts a new Purchase Order, the process will return the PO number, then the BPEL process will identify an specific process using the CustomerID and the OrderNumer. To do the previous logic, add the following to your WSDL. This is telling that the CID and Order will be used as a combined key.

                <!-- sendResponse -->
                <bpws:propertyAlias propertyName="tns:customerID" messageType="tns:sendPOResponse" part="confirmation">
                    <bpws:query><![CDATA[/tns:CID]]></bpws:query>
                </bpws:propertyAlias>
                <bpws:propertyAlias propertyName="tns:orderNumber" messageType="tns:sendPOResponse" part="confirmation">
                        <bpws:query><![CDATA[/tns:Order]]></bpws:query>
                </bpws:propertyAlias>

  4. Also, for each subsequent message sent to the BPEL process we will require that the user sends the CID and Order, to do that, define that while requesting a operation those values must be sent. Example:
                <!-- QUERY Request -->
                <bpws:propertyAlias propertyName="tns:customerID" messageType="tns:queryPORequest" part="query">
                    <bpws:query><![CDATA[/tns:CID]]></bpws:query>
                </bpws:propertyAlias>
                <bpws:propertyAlias propertyName="tns:orderNumber" messageType="tns:queryPORequest" part="query">
                    <bpws:query><![CDATA[/tns:Order]]></bpws:query>
                </bpws:propertyAlias>


  5. Now, define the correlationSets into your BPEL process
               <bpws:correlationSets>
                    <bpws:correlationSet name="PurchaseOrder" properties="tns:customerID tns:orderNumber"/>
                </bpws:correlationSets>

  6. As previously mentioned, the process will start when answering to the first request, so we define that inside the first reply activity:
                <bpws:reply name="replyOutput" operation="sendPO" partnerLink="POLink" portType="tns:purchaseOrderProcess" variable="output">
                    <bpws:correlations>
                        <bpws:correlation
    initiate="yes" set="PurchaseOrder"/>
                    </bpws:correlations>
                </bpws:reply>

       
  7. And in subsequent requests, the correlation only will be used, not initiated again. For example, while querying the process:

           <bpws:onMessage operation="queryPO" partnerLink="POLink" portType="tns:purchaseOrderProcess" variable="queryInput">
               <bpws:correlations>
                        <bpws:correlation
initiate="no" set="PurchaseOrder"/>
                </bpws:correlations>


Download the example from here.

Monday, September 14, 2009

Consuming external web services

Example of how to call an external Web Service from a BPEL process:

Follow these steps:
  1. First, download and install "HelloWorld" Web Service into your servlet container. This simple service has 2 operations:
    1. sum: returns the result of adding two numbers. This is the operation we will use.
    2. example: concatenates your input with "External WebService".
  2. Before calling this WS check if the web service is working fine. Test the "sum" operation.
  3. Open your Eclipse and create a new BPEL project. Name it as "HelloCaller".
  4. Create a new BPEL process file with the following data:
    1. BPEL Process name: helloCaller
    2. Namespace: http://mydomain.org/bpel/helloCaller
    3. Template: Synchronous BPEL process
  5. Add the HelloWorld WSDL file into the process. Be sure your file is visible to your project.


  6. Add a Partner Link and named it as "helloLnk".
  7. Open the details of "helloLnk" and click on "Browse" button. Then a dialog will appear, at the bottom click over the "Add WSDL" button. Select the HelloWorld WSDL file.
  8. Select the port named as "HelloWorldServicePortType"and click "OK" button; a new dialog will appear.
    1. Define the name of your Partner Link Type as "helloPLType" and click "Next" button.
    2. Type a Role Name as "helloProvider" and click "Finish" button.
  9. Bellow the "Partner Role" section select "helloProvider".


  10. Open the BPEL process (helloCaller.bpel) with the BPEL designer and add the following activities and name them as suggested:
    1. Assign: InitializeVars
    2. Invoke: SumNumbers
    3. Assign: SetResult

    You should see your diagram as the following:


  11. Open the properties of "SumNumbers" and select the "sum" operation from the "HelloWorldPortType".


  12. Open the properties of "InitializeVars" activity and add a copy step.
    1. From: Fixed Value

      <ns0:sum xmlns:ns0=http://webservice.augusto.org>
      <ns0:in0/>
      <ns0:in1/>
      </ns0:sum>

    2. To: Variable
    3. Select helloLnkRequest the "and then "parameters"


  13. Add a new copy step to "InitializeVar" with the following data:


  14. And add the last copy step to the "InitializeVars"


  15. Now, select the "SetResult" and add 2 steps. In the first one initialize the response:
    1. From: Fixed Value

      <tns:helloCallerResponse xmlns:tns="http://mydomain.org/bpel/helloCaller">
      <tns:result/>
      </tns:helloCallerResponse>
    2. To: Variable
    3. Select output the and then "payload"
  16. Finally, copy the result from the "HelloWorld" service to the output of your BPEL process.
  17. You need to define the service and the location of it.
  18. Define the deployment descriptor. Remember that for every partner link used with a <receive> activity must be matched with a <provide> element, and every partnerLink used in an <invoke> activity must be matched with an <invoke> element in deploy.xml. For example, for this process the following code is used:
<process name="pns:helloCaller">
<active>true</active>
<provide partnerLink="client">
<service name="pns:helloCallerService" port="helloCallerPort" />
</provide>
<!-- Hello World Web Service -->
<invoke partnerLink="helloLnk">
<service name="wns:HelloWorldService" port="HelloWorldServiceHttpPort" />
</invoke>
</process>

  1. Now, deploy your helloCaller service and test it. Download the example from here.

Software required to run the example:
  1. Eclipse
  2. BPEL designer for Eclipse - http://www.eclipse.org/bpel/
  3. Apache ODE 1.3.2

References

  1. How to create a Partner Link

Wednesday, August 5, 2009

BPEL fault handling

Faults in BPEL can arise in various situations:
  1. When a BPEL process invokes a synchronous web service operation, the operation might return a WSDL fault message, which results in a BPEL fault.
  2. A BPEL process can explicitly signal (throw) a fault.
  3. A fault can be thrown automatically, for example, selectionFailure or uninitializedVariable; these typically indicate a problem in your process where you've not implemented something correctly.
  4. The BPEL server might encounter error conditions in the run-time environment, network communications, or any other such reason. This kind of faults are called "Failures".

Here is an example of how to catch and access WSDL faults thrown by an External Web Service. This is the scenario:

  1. You have an external web service named "fault". This WS generates a fault because something in it fails.
  2. Then, you have a BPEL process named "faultCaller" that calls the "fault" service, so you must catch the fault thrown.
  3. Also, if a network failure appears while calling the "fault" service, then your BPEL process should handle that error.

Let's create the scenario, first the "fault" service

  1. Declare a fault message:

    <element name=" MyFault">
    <complexType>
    <sequence>
    <element name="myError" type="string"></element>
    </sequence>
    </complexType>
    </element>


    <message name="FaultMessage">
    <part name=" payload" element="tns:MyFault"></part>
    </message>


    <operation name="process">
    <input message="tns:FaultHRequestMessage"/>
    <output message="tns:FaultHResponseMessage"/>
    <fault name=" fault"message=" tns:FaultMessage"></fault>
    </operation>

  2. Then, inside your BPEL process throw an arbitrary fault:


    < bpws:throw faultName=" someFault"/>
  3. Finally, build your fault message:


    <bpws:from>
    <bpws:literal>Error from External WebService </bpws:literal>
    </bpws:from>
    <bpws:to part=" payload" variable=" myFault">
    <bpws:query queryLanguage=" urn:oasis:names:tc:wsbpel:2.0:sublang:xpath1.0"> <![CDATA[/tns:myError ]]> </bpws:query>
    </bpws:to>

  4. Deploy it as

    <soap:address location=" http://localhost:8080/ode/processes/fault">


Now, create "faultCaller" service

  1. First, add the namespace for the failure handling.

    < xmlns:ext="http://ode.apache.org/activityRecovery">

  2. Declare the variable that will hold the error comming from the "fault" service.
    <bpws:variable messageType=" ns0:FaultMessage" name=" faultMaker" />


  3. Inside the invoke activity that calls the "fault" service put the fault handling activities. First lets put the failureHandling structure.

      <ext:failureHandling>
    <ext:faultOnFailure>true</ext:faultOnFailure>
    <ext:retryFor>2</ext:retryFor>
    <ext:retryDelay>30</ext:retryDelay>
    </ext:failureHandling>

  4. Now, Catch run-time environment faults, like network communications issues:
    <bpws:catch faultName="ext:activityFailure" >
    activity
    </bpws:catch>


  5. And finally, catch your own faults comming from the "fault" service.
    <bpws:catch faultName="ns0:fault" faultVariable="faultMaker" faultMessageType="ns0:FaultMessage">
    activity
    </bpws:catch>


  6. Your BPEL process should be like the following diagram:

While calling "faultCaller", you should catch your fault message error comming from "fault" service, and if you undeploy the "fault" service, then if you call again the "faultCaller" you should catch the failure.

Download the whole example from here.

Wednesday, July 15, 2009

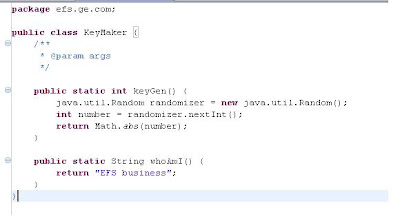
Calling custom Java classes from BPEL

You can call some of your custom java classes in the form of extension functions. An extension function is invoked using a name such as prefix:localname(). The prefix must be the prefix associated with a namespace declaration that is in scope.

Extension functions must be implemented in Java. You bind external Java classes by encoding the class name part in the namespace URI. The URI for the namespace identifies the class where the external function will be found. The namespace URI must be "java:" followed by the fully-qualified class name; for example xmlns:date="java:java.util.Date"). The class must be on the classpath, or more specifically accessible from the current classloader.

Example:
First, create your Java class.


Second, pack your new java class into a jar file and put it accessible from the current classloader.
If ODE is deployed as a webapp, you can copy your XPath function jar in the webapp /lib directory
If ODE is deployed inside a JBI container, you can deploy your XPath function jar as a shared library. Finally call your Java class from your BPEL code.


Download the example from here.

Apache ODE with JBoss and Oracle

The following steps describe how you can install Apache Ode with JBoss and Oracle.

Assumptions:
Apache ODE 1.2
JBoss 4.2.2.GA installed
Oracle 9i installed

  1. Get the copy of Apache ODE 1.2. (apache-ode-war-1.2.zip), unpacking it and rename it as "ode.war". Put that war into JBOSS_HOME\server\default\deploy.
  2. Create the schema in Oracle. All the objects can be created with the sql script located in the ODE that you already downloaded.
  3. During your first running of ODE, hibernate will create some tables, but for some odd reason LARGE_DATA table is wrong, so you need to created by hand. Please see this sql scritp to create it. created correctly.
  4. Get the Oracle 10g driver (ojdbc14.jar) and put it into JBOSS_HOME\server\default\lib
  5. Create a new datasource in JBoss. You can see one here for Oracle.
  6. Remove this JAR from ode.war (not compatible with JBoss):
    geronimo-jta_1.1_spec-1.1.jar
  7. Create a new file called "ode-axis2.properties" and put it into "ode.war/WEB-INF/conf/". The content of that file should be like this example.
  8. Create a new file named "jboss-web.xml" and put it into "ode.war/WEB-INF". The content must refer to the previously datasource created. See this example.
  9. Edit the ode.war\WEB-INF\web.xml file and create a reference to the datasource. See this example.
  10. When running JBoss, be sure that you give this parameter -Dode.persistence=hibernate. For example, add to the run.bat this: set JAVA_OPTS=%JAVA_OPTS% -Dode.persistence=hibernate

References:
Install ODE 1.2 with JBOSS 4.2.3 (spanish)
Apache Ode, Jboss and MySQL