Wednesday, July 15, 2009

Calling custom Java classes from BPEL

You can call some of your custom java classes in the form of extension functions. An extension function is invoked using a name such as prefix:localname(). The prefix must be the prefix associated with a namespace declaration that is in scope.

Extension functions must be implemented in Java. You bind external Java classes by encoding the class name part in the namespace URI. The URI for the namespace identifies the class where the external function will be found. The namespace URI must be "java:" followed by the fully-qualified class name; for example xmlns:date="java:java.util.Date"). The class must be on the classpath, or more specifically accessible from the current classloader.

Example:
First, create your Java class.
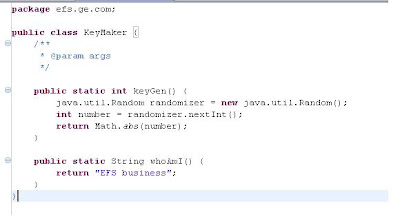


Second, pack your new java class into a jar file and put it accessible from the current classloader.
If ODE is deployed as a webapp, you can copy your XPath function jar in the webapp /lib directory
If ODE is deployed inside a JBI container, you can deploy your XPath function jar as a shared library. Finally call your Java class from your BPEL code.


Download the example from here.

Apache ODE with JBoss and Oracle

The following steps describe how you can install Apache Ode with JBoss and Oracle.

Assumptions:
Apache ODE 1.2
JBoss 4.2.2.GA installed
Oracle 9i installed

  1. Get the copy of Apache ODE 1.2. (apache-ode-war-1.2.zip), unpacking it and rename it as "ode.war". Put that war into JBOSS_HOME\server\default\deploy.
  2. Create the schema in Oracle. All the objects can be created with the sql script located in the ODE that you already downloaded.
  3. During your first running of ODE, hibernate will create some tables, but for some odd reason LARGE_DATA table is wrong, so you need to created by hand. Please see this sql scritp to create it. created correctly.
  4. Get the Oracle 10g driver (ojdbc14.jar) and put it into JBOSS_HOME\server\default\lib
  5. Create a new datasource in JBoss. You can see one here for Oracle.
  6. Remove this JAR from ode.war (not compatible with JBoss):
    geronimo-jta_1.1_spec-1.1.jar
  7. Create a new file called "ode-axis2.properties" and put it into "ode.war/WEB-INF/conf/". The content of that file should be like this example.
  8. Create a new file named "jboss-web.xml" and put it into "ode.war/WEB-INF". The content must refer to the previously datasource created. See this example.
  9. Edit the ode.war\WEB-INF\web.xml file and create a reference to the datasource. See this example.
  10. When running JBoss, be sure that you give this parameter -Dode.persistence=hibernate. For example, add to the run.bat this: set JAVA_OPTS=%JAVA_OPTS% -Dode.persistence=hibernate

References:
Install ODE 1.2 with JBOSS 4.2.3 (spanish)
Apache Ode, Jboss and MySQL